
Containerize and Deploy a Full Stack MERN Application : Working with Docker Compose (Module 3)
Containerize a fullstack MERN application with Docker while utilizing Docker compose.


Introduction
In my previous articles, I covered the concepts of Docker for containers and then a hands on approach to containerizing a frontend React.js Application. In all these, we have only understood how to work with containers for one service mostly ( Eg: A frontend React.js Application).
In real life scenarios, developers mostly work with full stack applications. These mostly have frontend, backend and database services. It is important to note, the different parts of an application like the backend, frontend can be referred to as services.
Now the usual steps to Containerize a single service would be:
Build the Application
Create a Dockerfile.
Build the docker image from the docker file.
Run the docker container.
Now, for a scenario where you have to containerize a full stack application with three or more services, you would have to perform all steps multiple times. This is obviously very tiring and takes away the convenience containers should provide.
What if there was a solution that could automatically perform all these steps?
What if a tool which could watch for changes and updates our apps existed?
Introduction to Docker Compose
Docker Compose is a tool by Docker Inc for defining and running multi-container/service applications, It simplifies the control of your entire application stack, making it easy to manage services, networks, and volumes. It makes use of a single configuration file (compose.yaml). With a single command, you build and start all the services in your application.
Another exciting feature of docker compose is the compose watch feature that watches for all changes and updates our applications while they are running. We would see it's importance once our app is running, you can read more about compose watch in this article.
Now, enough has been said. lets us jump right in to containerize a MERN (MongoDB, Express.js, React.js and Node.js Application).
Containerize a full stack MERN Application
This section is hands on and will comprise of the following steps to complete, It is important to note, you should create your frontend and backend folders before working with this tutorial:
Create Dockerfiles in both the frontend and backend folders.
In the root folder of the project, you create the compose.yaml file.
Optionally you can create the .dockerignore files but it is highly advised that you do.
Run the docker compose up command to get the build process started.
Start the docker compose watch process for previewing and running as you update your code.
Step 1 : Create a Dockerfile.
In the frontend directory, create a file with name Dockerfile.
# specify the base image
FROM node:20-alpine
# Set the working directory
WORKDIR /app
# Copy application files
COPY package*.json ./
# TIme to install all the dependencies
RUN npm install
# Copy application files
COPY . .
# expost the application
EXPOSE 5173
# specify the command to start application
CMD npm run dev
In the backend directory, create a file with name Dockerfile.
# specify the base image
FROM node:20-alpine
# Set the working directory
WORKDIR /app
# Copy application files
COPY package*.json ./
# TIme to install all the dependencies
RUN npm install
# Copy application files
COPY . .
# expost the application
EXPOSE 4000
# specify the command to start application
CMD npm start
You can read more on Dockerfiles to understand them, but added comments should aid you in understanding the commands and functions.
Step 2 : Create the compose.yaml file.
Create the compose.yaml file in the root directory of the application, you can copy and paste for usage. Comments have been provided to help you understand the context and meaning of commands in this compose.yaml file.
# specify the version of docker-compose
version: "3.8"

# define the services/containers to be run
services:
  # define the frontend service
  # we can use any name for the service. A standard naming convention is to use "web" for the frontend
  web:
    # we use depends_on to specify that service depends on another service
    # in this case, we specify that the web depends on the api service
    # this means that the api service will be started before the web service
    depends_on:
      - api
    # specify the build context for the web service
    # this is the directory where the Dockerfile for the web service is located
    build: ./person-app
    # specify the ports to expose for the web service
    # the first number is the port on the host machine
    # the second number is the port inside the container
    ports:
      - 5173:5173
    # specify the environment variables for the web service
    # these environment variables will be available inside the container
    environment:
      VITE_API_URL: http://api:4000

    # this is for docker compose watch mode
    # anything mentioned under develop will be watched for changes by docker compose watch and it will perform the action mentioned
    develop:
      # we specify the files to watch for changes
      watch:
        # it'll watch for changes in package.json and package-lock.json and rebuild the container if there are any changes
        - path: ./person-app/package.json
          action: rebuild
        - path: ./person-app/package-lock.json
          action: rebuild
        # it'll watch for changes in the frontend directory and sync the changes with the container real time
        - path: ./person-app
          target: /app
          action: sync

  # define the api service/container
  api:
    # api service depends on the db service so the db service will be started before the api service
    depends_on:
      - db

    # specify the build context for the api service
    build: ./backend

    # specify the ports to expose for the api service
    # the first number is the port on the host machine
    # the second number is the port inside the container
    ports:
      - 4000:4000

    # specify environment variables for the api service
    # for demo purposes, we're using a local mongodb instance
    environment:
      MONGODB_URI: mongodb://db:27017/personDB
      JWT_SECRET = GZDQD92DYPW1VG8QU5MV
      PORT = 4000


    # establish docker compose watch mode for the api service
    develop:
      # specify the files to watch for changes
      watch:
        # it'll watch for changes in package.json and package-lock.json and rebuild the container and image if there are any changes
        - path: ./backend/package.json
          action: rebuild
        - path: ./backend/package-lock.json
          action: rebuild

        # it'll watch for changes in the backend directory and sync the changes with the container real time
        - path: ./backend
          target: /app
          action: sync

# define the db service
  db:
    # specify the image to use for the db service from docker hub. If we have a custom image, we can specify that in this format
    # In the above two services, we're using the build context to build the image for the service from the Dockerfile so we specify the image as "build: ./frontend" or "build: ./backend".
    # but for the db service, we're using the image from docker hub so we specify the image as "image: mongo:latest"
    # you can find the image name and tag for mongodb from docker hub here: https://hub.docker.com/_/mongo
    image: mongo:latest

    # specify the ports to expose for the db service
    # generally, we do this in api service using mongodb atlas. But for demo purposes, we're using a local mongodb instance
    # usually, mongodb runs on port 27017. So we're exposing the port 27017 on the host machine and mapping it to the port 27017 inside the container
    ports:
      - 27017:27017

    # specify the volumes to mount for the db service
    # we're mounting the volume named "anime" inside the container at /data/db directory
    # this is done so that the data inside the mongodb container is persisted even if the container is stopped
    volumes:
      - person-data:/data/db

# define the volumes to be used by the services
volumes:
  person-data:
It is important to note that you should change the folder names in the addresses if you choose to name differently.
Example: ./backend/package.json, you can change the name "backend" depending on the name of your backend directory. Any errors in names and addresses would disrupt the command and cause errors.
Now pay special attention to the db section in this compose.yaml file, we are actually pulling and working with a mongoDB image from dockerhub instead of a local database.
The volumes part of the file is for backup data from the container to the host machine for storage purposes.
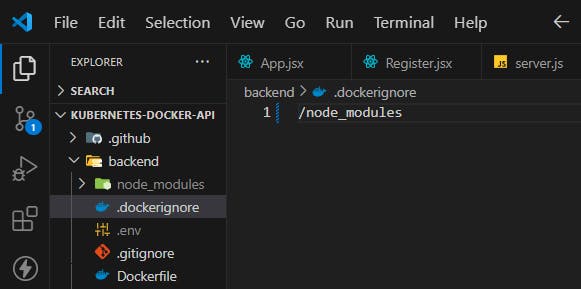
Step 3 : Create .dockerignore file.
Now for the .dockerignore files you can simply specify the node_modules folder there, this ensures that and push operations for images to the docker hub ignore the node modules. This .dockerignore file should be created in both frontend and backend folders respectively
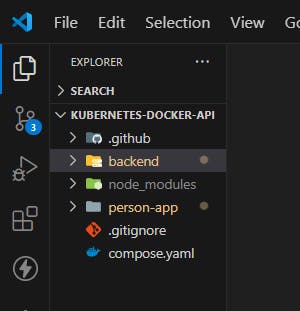
You should have a file structure similar to the image below by the time you are finished with all instructions above.
Step 4 : Run the docker compose command.
We have gone a long way already! but we still have some more work to do. Ensure your docker desktop is up and running as this runs your docker engine automatically. To start the service, run the command below in your terminal:
# for windows
docker compose up

# for macos
sudo docker compose up
This commands executes every single instruction we specified in the compose.yaml file earlier. It automatically builds and runs the images for both services and runs the application.
You should see large logs to the terminal like in the image below, It's just part of the process.
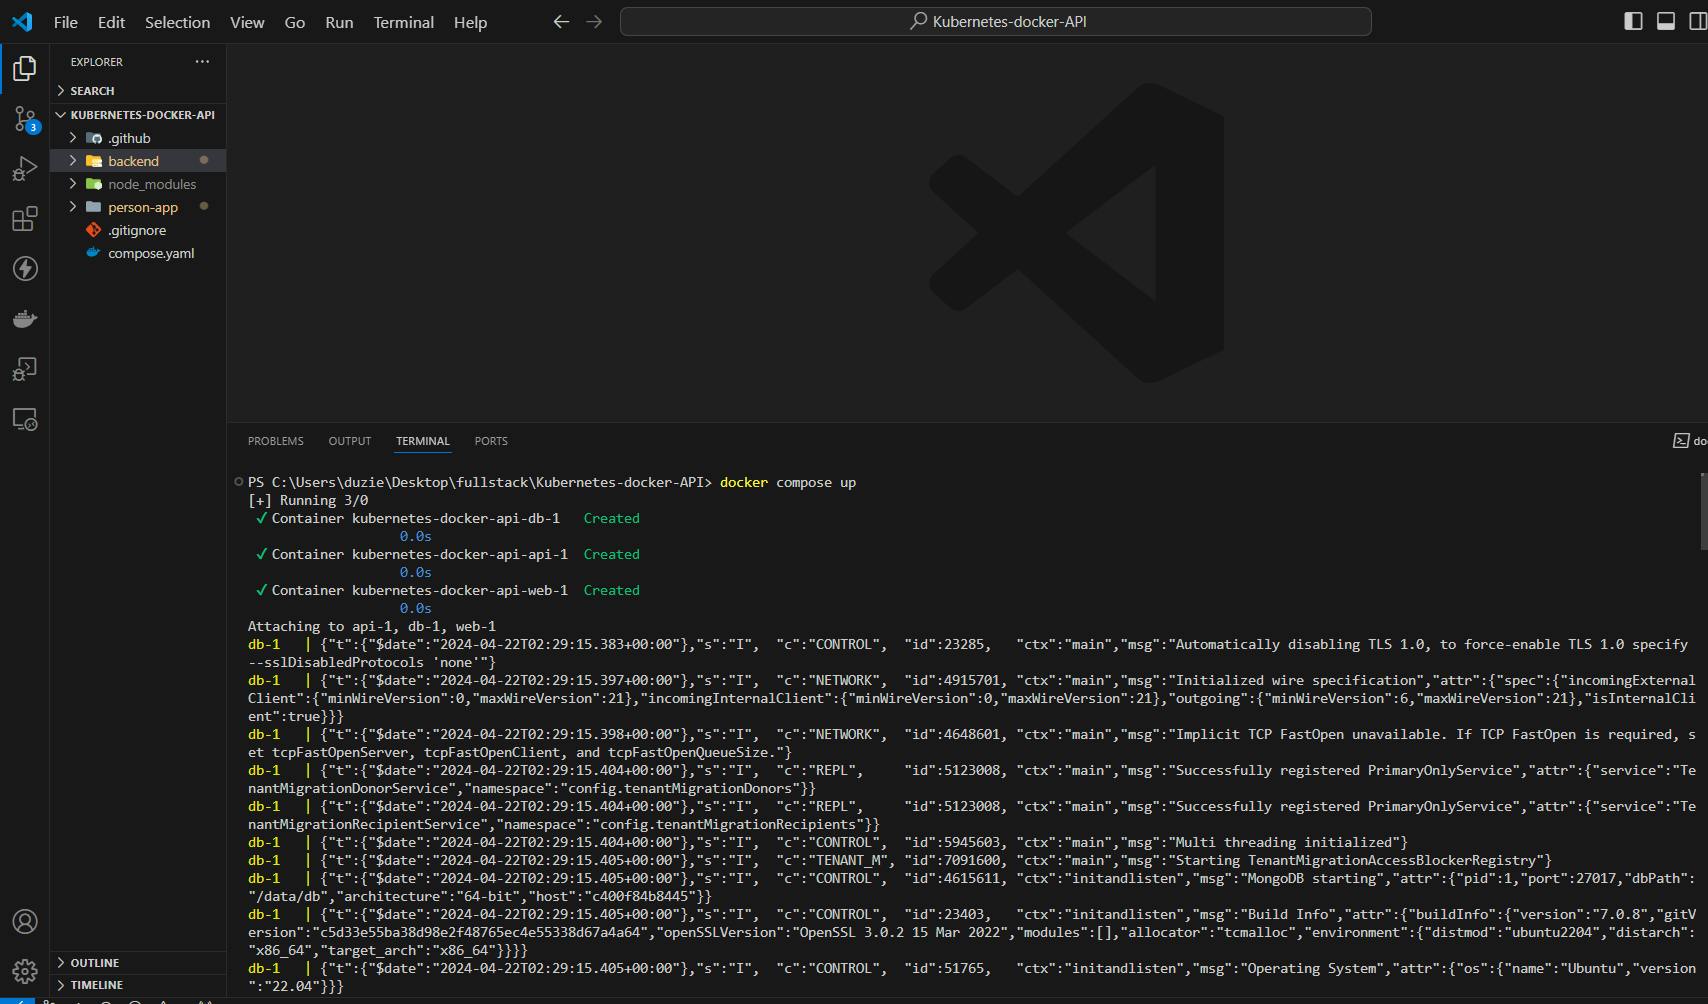
It would build and run containers and services for all three services (frontend, backend, database) in a seamless operation.
You should see three containers running in your docker desktop interface just like below.

Step 5 : Start the compose watch process.
Your application should run perfectly in the browser and you can make changes to your code. The next step is try to edit your code to make changes, but then you notice the output on the browser remains the same.
No need to panic, docker compose watch will handle all that for you. To start it, you can split your terminal and run the command below:
docker compose watch
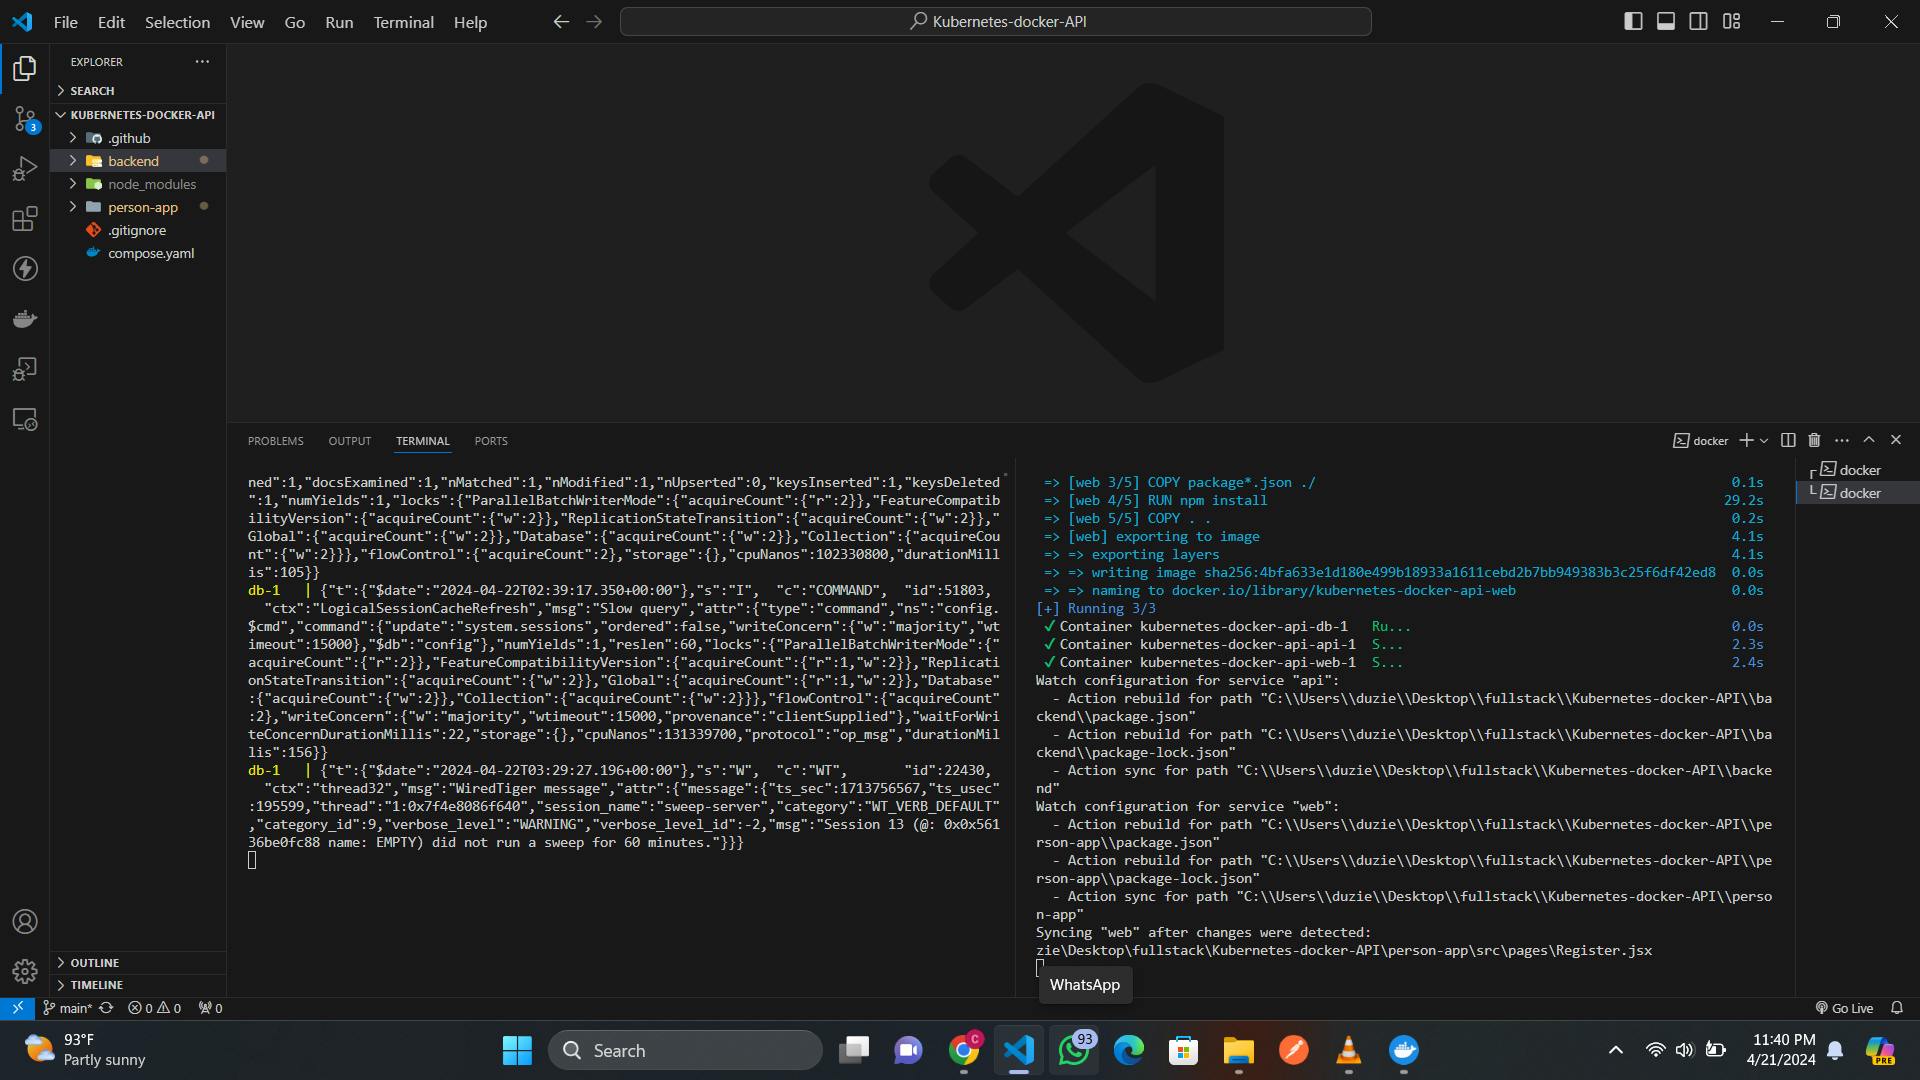
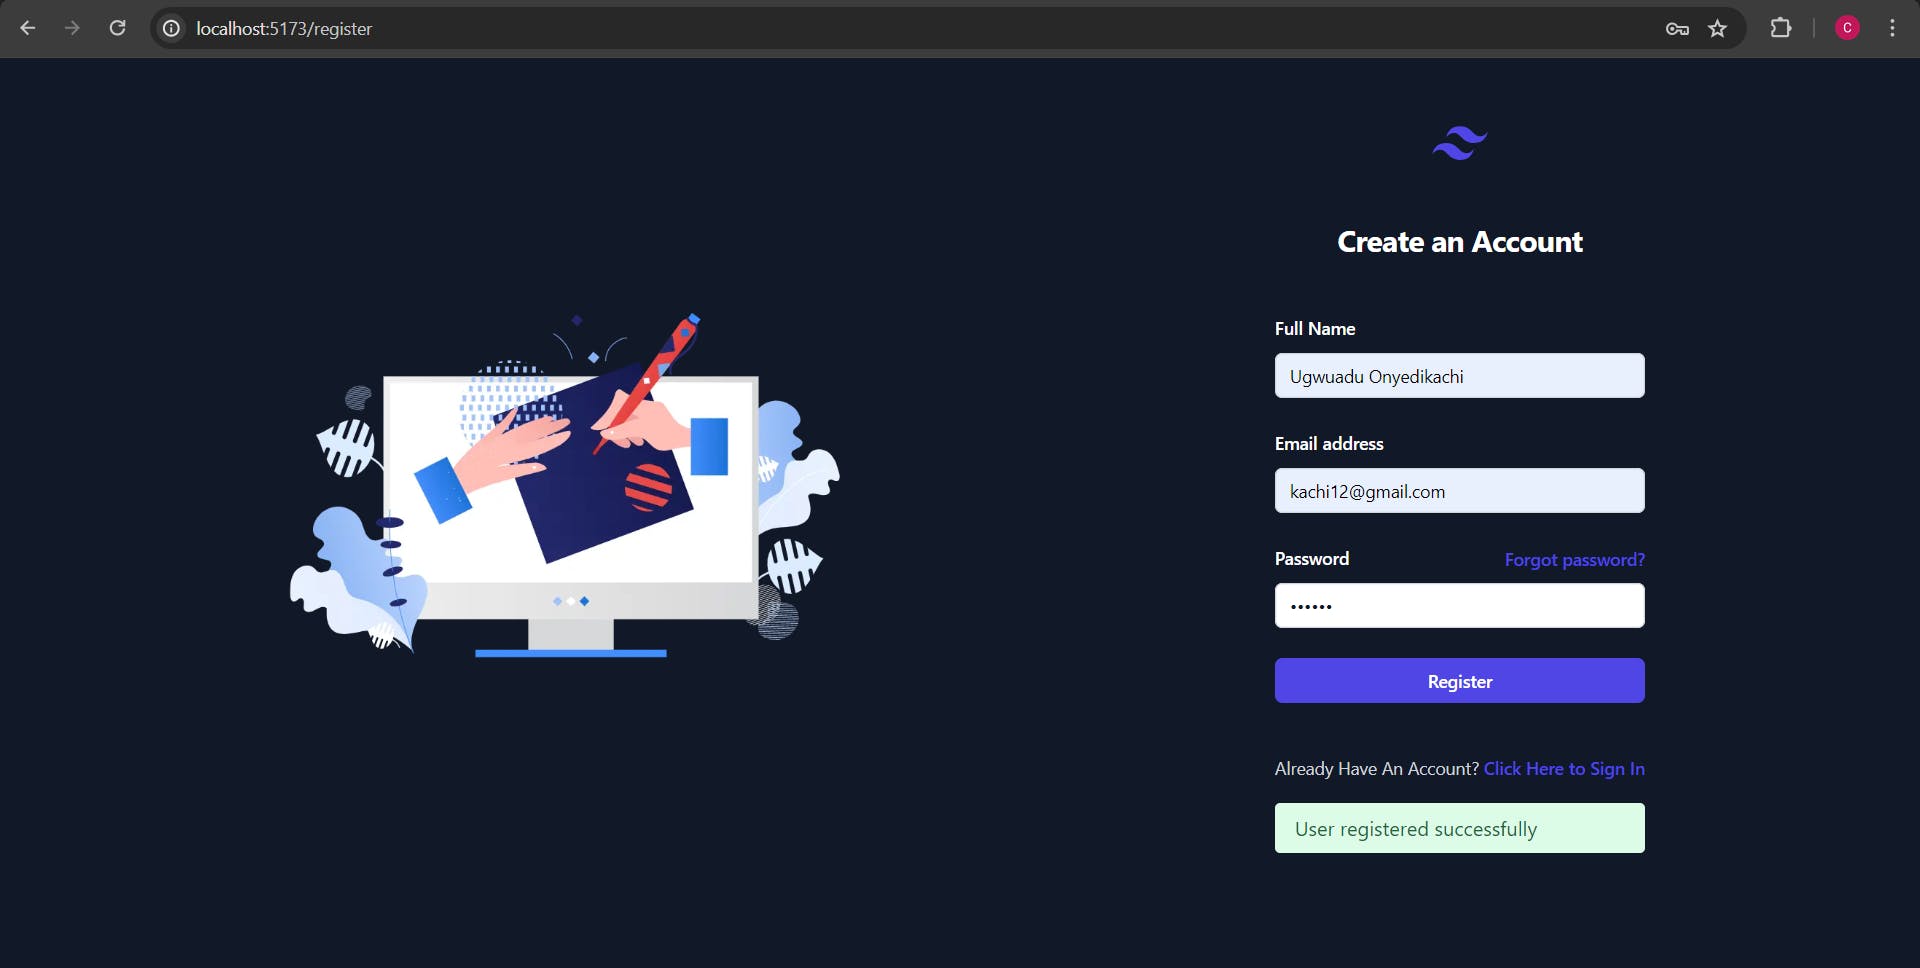
The compose watch then starts the watch process and updates your application according to the changes made in code. My application, as you will see below is a JWT auth service and it works perfectly in registering and logging users in.
If you made it to this part of the article, Congratulations. You can now run your full stack applications in containers and utilize all the advantages compose and compose watch for your workflow.
NOTE: The most crucial part for a seamless workflow with docker compose is ensuring a well defined compose.yaml file. Ensure all addresses and configurations are properly defined to avoid errors.
If you found this helpful, give me a follow and subscribe to my news letter.